
An essential first step for many system administrators and developers using Ubuntu 22.04 is installing Java. Programming languages like Java are extensively utilized and power a multitude of services and apps on different platforms. You may guarantee that you have the most recent version of Java installed on your machine and speed up the process by using Ubuntu’s Advanced Package Tool (APT). Boost your network troubleshooting skills with this complete direction on installing Wireshark on Ubuntu, enabling you to monitor and analyze network traffic easily.
The goal of this article is to give you a clear and simple tutorial on how to install Java on Ubuntu 22.04 using APT so that you may take advantage of its capabilities for system operations and development projects. Improve your online projects at maximum uptime possibility with our top-tier virtual server in India.
This tutorial will walk you through using apt to install several versions of the Java Developer Kit (JDK) and the Java Runtime Environment (JRE). Both OpenJDK and the standard JDK from Oracle will be installed. After that, you can choose which version to utilize for your projects. Once you’re done, you can run software using the Java Runtime or write programs using the JDK. Transform your trading contest with a progressive server that is prepared to deliver remarkable Forex VPS hosting performance.
Required Conditions
To complete this tutorial, you’ll need:
- One Ubuntu 22.04 server, complete with a firewall and sudo non-root user, was configured by following the instructions in the Ubuntu 22.04 basic server setup guide lesson.
Install Java with Apt on Ubuntu 22.04
Step 1: Setting up Java
Java installations consist of two primary parts. Compiler and debugger are two of the most important software tools in the JDK for Java development. Java programs are executed by the JRE. Additionally, there are two primary Java installation choices available. The open-source Java implementation, OpenJDK, is included in the Ubuntu package. The original Java version, known as Oracle JDK, is still fully supported by Oracle, the Java creators.
Oracle has officially recognized both of these versions. Both are created by Oracle, but because OpenJDK is open-source, it also benefits from community contributions. But as Oracle explains, as of Java 11, the two solutions are now functionally equivalent. Selecting the license that is right for your situation will determine which to install. Furthermore, OpenJDK allows you to install the JRE independently, whereas OracleJDK includes the JRE in the package.
Option 1: Installing the default JRE and JDK
Using the Java included with Ubuntu is one way to install it. Ubuntu 22.04 is pre-installed with Open JDK 11, an open-source version of the JRE and JDK.
To begin installing Java’s OpenJDK version, update your apt package index first:
$ sudo apt update
Next, see if Java has been installed already:
$ java -version
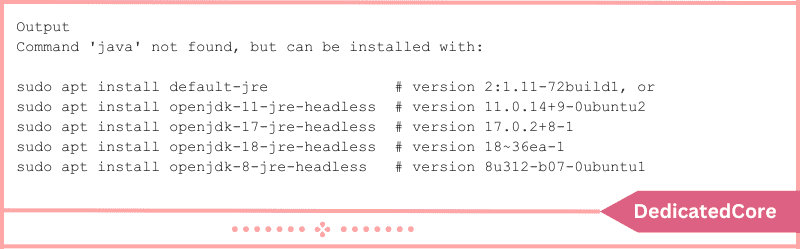
The output that appears if Java is not currently installed is as follows:

The JRE from OpenJDK 11 can be installed by using the following command:
$ sudo apt install default-jre
You can execute nearly all Java software with the JRE.
Use this to confirm the installation:
$ java -version
You’ll get results that resemble this:
Some Java-based software may require the JDK in addition to the JRE for compilation and operation. Use the following command to install the JDK and the JRE at the same time:
$ sudo apt install default-jdk
Examine the Java compiler version, javac, to confirm that the JDK is installed:
$ javac -version
This is what you will see as an output:

You will then be taught how to install the official JDK and JRE from Oracle.
Option 2: Installing Oracle JDK 1.
Package managers are not permitted to use automatic installation for Java according to Oracle’s licensing agreement. You need to register for an Oracle account, download the JDK by hand, and add a new package repository for the version you want to use to install the official Oracle JDK. Then, with the aid of an independent installation script, you can utilize apt to install it. The JRE is preinstalled with Oracle JDK, therefore you don’t need to install it separately.
The installation script’s version and the Oracle JDK version you need to download must match. Go to the oracle-java11-installer page to determine the version you require. Find Jammy’s package, as indicated by the accompanying figure:
The script version in this image is 11.0.13. You would require Oracle JDK 11.0.13 in this scenario. Depending on when you’re installing the software, your version number can change.
Nothing has to be downloaded from this website. apt will soon provide the installation script for you to download. Next, find the version that corresponds to the one you require by going to Archive Downloads.
Select the Linux x64 compressed archive.tar.gz package from this list: A screen asking you to accept the Oracle licensing agreement will appear. To accept the licensing agreement, check the box and click the “Download” button. The download will start for you. Before the download begins, you might need to connect to your Oracle account once again.
After the file has finished downloading, you must move it to your server. Upload the file to your server from your local PC. Use the scp command on macOS, Linux, or Windows utilizing the Windows Subsystem for Linux to move the file to your ‘xyz’ user’s home directory. Assuming you have the Oracle JDK file saved in the Downloads folder on your local computer, run the following command:
$ scp Downloads/jdk-11.0.13_linux-x64_bin.tar.gz xyz@your_server_ip:~
Return to your server after the file upload is finished, and add the third-party repository that will assist you in installing Oracle Java.
Import the signing key that was used to confirm the installation of the software first:
$ sudo gpg --homedir /tmp --no-default-keyring --keyring….
This output is what you’ll see:

The repository should then be added to your list of package sources:
$echo"deb[arch=amd64signed-by=/usr/share/keyrings/oracle-jdk11-installer.gpg]....
To enable the installation of the new program, update your package list:
$ sudo apt update
The Oracle JDK that you downloaded will be sought for by the installer in /var/cache/oracle-jdk11-installer-local. After creating it, transfer the Oracle JDK archive to this directory:
$ sudo mkdir -p /var/cache/oracle-jdk11-installer-local/
$ sudo cp jdk-11.0.13_linux-x64_bin.tar.gz /var/cache/oracle-jdk11-installer-local/
Install the package lastly:
$ sudo apt install oracle-java11-installer-local
You will initially be prompted by the installation to approve the Oracle license agreement. Once you accept the terms, the installer will start to extract and install the Java package.
Step 2: Handling Java
On a single server, several Java installs are possible. With the update-alternatives command, you can set which version is the default to be used on the command line.
$ sudo update-alternatives --config java
If you followed this guide and installed both versions of Java, here is what the output would look like:
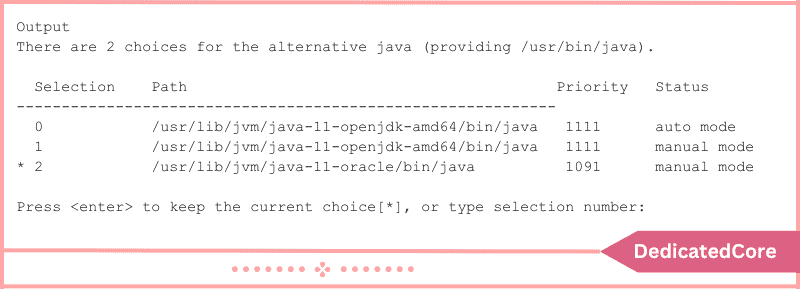
To set the Java version as the default, select the corresponding number, or hit ENTER to maintain the current configuration.
This also applies to other Java commands, such javac (compiler):
$ sudo update-alternatives --config javac
This command can also be used with the following other commands: keytool, javadoc, and jarsigner, among others.
Step 3: Configuring the Environment Variable JAVA_HOME
The JAVA_HOME environment variable is used by many Java-written programs to identify the Java installation location.
Locate the Java installation location before setting this environment variable. Apply the command update-alternatives:
$ sudo update-alternatives --config java
This command displays the installation path for each Java installation:

The installation paths in this instance are as follows:
- /usr/lib/jvm/java-11-openjdk-amd64/bin/java is the location of OpenJDK 11.
- Go to /usr/lib/jvm/java-11-oracle/jre/bin/java to access Oracle Java.
Take a copy of the path from the installation you like. Next, use nano or another text editor of your choice to open /etc/environment:
$ sudo nano /etc/environment
Place the following line at the end of this file, ensuring that your copied path replaces the highlighted path and that the bin/ section of the path is excluded:

All users on your system will have their JAVA_HOME path set if you modify this file. After saving the file, close the editor.
To apply the modifications to your current session, refresh this file now:
$ source /etc/environment
Check to see if the environment variable is defined:
$ echo $JAVA_HOME
The path you just set will be visible:

To apply this setting, other users must run the command source /etc/environment or log out and back in.
Final Words on Installing Java on Ubuntu 22.04
To sum up, installing Java using APT on Ubuntu 22.04 is a simple procedure that enables users to easily take advantage of this flexible programming language. You may make sure that your Ubuntu system has the most recent version of Java installed and is prepared to support a variety of programs and services by following the instructions provided in this article.
Whether you work as a system administrator overseeing Java-based services or as a developer creating Java apps, knowing how to install packages on Ubuntu 22.04 will provide you with a strong starting point for your projects. Install Anaconda on Ubuntu 18.04 | 22.04 with this clear manual to seamlessly manage Python environments and dependencies, empowering your data science and machine learning projects.