Web developers have endless possibilities when they install Django on Ubuntu. It offers a stable, expandable framework. It makes it easy to create dynamic web apps. Django is famous for its “batteries-included” approach. It has a vast toolset to speed up development. This includes an ORM, an authentication system, and an admin interface. This article will guide you through the steps to install Django on Ubuntu. It will make sure you have what you need to start web development projects fast. Understand the key differences between Node.js and Django. This will help you choose one.
The Django Software Foundation developed and continues to maintain Django. It is a free online app framework built on Python. It lets users quickly create apps by fixing common issues like SQL injection, CSRF, and XSS. It is a powerful, lightweight tool. It uses the MVC architecture. Our top service, the German dedicated server, offers expert help. It delivers the best hosting solutions.
Globally, app developers use it, including those from large IT companies. Some of the most well-known websites were also made with it. The most well-known websites built with Django are The Washington Post, Instagram, Disqus, Pinterest, Knight Foundation, and Disqus.
In this writing, we will review each installation method’s benefits in the relevant parts. This brings us to the topic of the Ubuntu repositories installation process. Our Netherlands server model offers high-quality vps services with Linux. So, you won’t have to worry about downtime in Amsterdam.
Method 1: Install first through the official Ubuntu Repositories.
The easiest way to install Django on an Ubuntu server is to use the apt package manager with Ubuntu’s official repos. The method is simple. But, it may have fewer options than other ways.
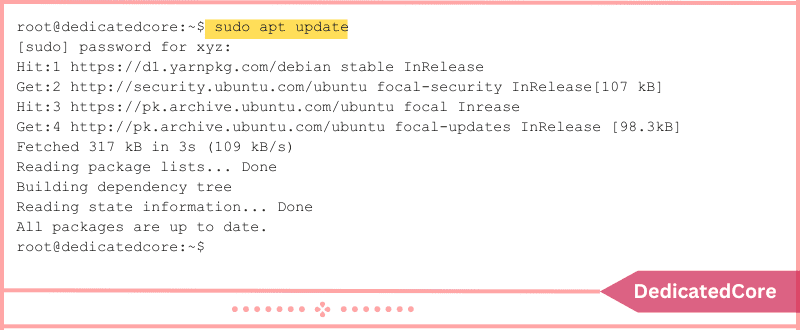
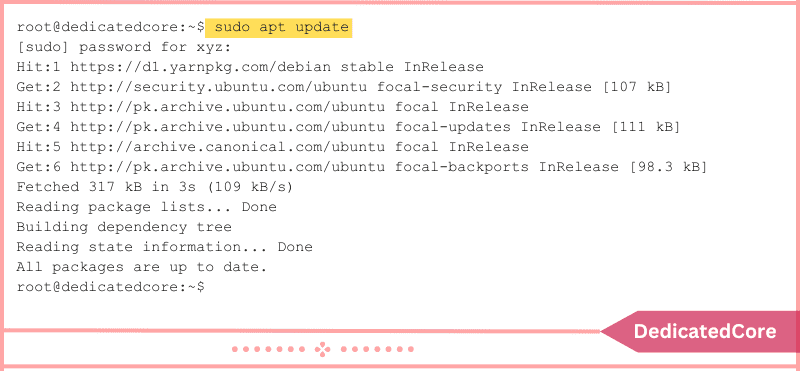
Step 1: Make a list of packages updated.
First, use the following command to update your server’s package index:
$ sudo apt update
Step 2: Make a Python Version Update
Use the following command to find out which version of Python is installed on your computer:
$ python3 -V

You should see the Python version that is currently installed on your machine.
Step 3: Install Django Now
It’s now necessary to install Django. Apply the subsequent command:
$ sudo apt install python3-django

You should install Django on your computer. All that’s left to do is confirm the installation.
Step 4: Check the Installation
Put the following command into the box:
$ django-admin --version
It is possible that the version you have installed is not the most recent one. One disadvantage of downloading from the official repositories is that the most recent version isn’t always accessible. That being said, it’s not a big deal because you can always update the item.
Method 2: Installing from Git Repositories.
Git Repos allows you to download the development version, which is more volatile but has the newest features, while the Ubuntu repositories only offer the most recent stable version.
Using Venv to create a virtual environment, Django will be downloaded from the GIT for this tutorial.
Step 1: First, Update the Package Index.
Use the following code to view the versions that can be downloaded:
$ sudo apt update
Step 2: Verify the Version of Python that is Installed on your PC.
Use the following command to find out which version of Python is installed on your computer:
$ python3 -V

You should see the Python version that is currently installed on your machine.
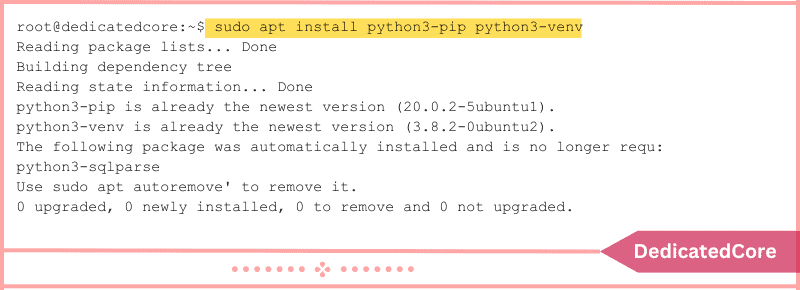
Step 3: Downloading Python Packages
Pip is a Python package management system that needs to be installed. Additionally, you will require Venv if it isn’t already installed.
To obtain both of these, input the subsequent command:
$ sudo apt install python3-pip python3-venv
After that, clone the repository using your home directory to the ~/django-dev directory. Enter the following commands:
$ git clone git://github.com/django/django ~/django-dev

$ cd ~/django-dev

Step 4: Use Venv to Create a Virtual Environment.
Next, use the Venv module to establish a virtual environment on which to install Django. Enter the following command:
$ python3 -m venv my_env

$ source my_env/bin/activate

On your machine, a virtual environment has been enabled.
Step 5 Set up Django
After that, pip may be used to install the repository. Enter the following command:
$ pip install -e ~/django-dev

By typing: you may confirm that the installation was successful.
$ django-admin --version

That is all. The most recent version of Django has been installed on your computer.
Final Words on Installing Django on Ubuntu
With Django now installed on your Ubuntu machine, you can create powerful web apps. Let your imagination run wild. Use Django’s features, docs, and community to create great apps. Ghost is a CMS built on node.js technology, and you can learn how to install Ghost on Ubuntu.
Django is a great choice for web development on Ubuntu. It’s easy to use and adapt, no matter your skill level. Embrace the Django framework. As you build unique web apps, let your creativity run wild.
Frequently Asked Questions (FAQ)
1. What is Django? Why should I Install it on Ubuntu?
Django is a high-level Python web framework. It enables rapid, secure, and scalable web app development. Its built-in features make it great for developers. They include an ORM, an admin interface, and authentication.
For DomainRacer users, installing Django on Ubuntu is vital. It lets you use the framework’s power on VPS hosting. You can then deploy efficient web apps.
2. Which Database is best for Django on Ubuntu?
Django supports many databases, including PostgreSQL, MySQL, and SQLite. SQLite is the default for development. But, for production on DomainRacer VPS, use PostgreSQL or MySQL. They are more scalable and performant. You can install and configure the database using the following commands:
PostgreSQL:
sudo apt install postgresql postgresql-contrib
MySQL:
sudo apt install mysql-server