
Branching is a key Git feature. It helps with experimentation and collaboration on projects. One of the most important things any developer should know how to do is create a new branch in Git. Create a separate branch. You can then work on features or fixes without affecting the main codebase. This quick tutorial will show you how to create a new Git branch. It will help you manage your project’s development. Git helps developers work on projects from different locations. It can work with remote repositories.
Git is an open-source tool. It tracks changes to software over its life cycle. It has a unique, independent branching architecture. It sets it apart from other version control systems. With Git, a branch is a copy of the master repo. It lets developers work on a feature without changing the master codebase.
Required Conditions
- An installation of Git.
- The capacity to operate a terminal window or command line.
- A distant or local Git repository.
Overview of the Git Branch Command
With the help of the flexible git branch command, users can control branches and learn about the relationships between branches inside the repository. The command has the following syntax.
git branch [options] [branch_name]
None of the [options] are required. Listing branches is one of the simplest actions that may be done by running git branch without arguments.
The following are some of the uses for the git branch command:
- Establishing new regional posts. Based on their current branch, users can establish a new branch with the given name.
- Removing current branches. While the -D option deletes a branch regardless of its merge status, the -d option tells Git to delete a merged branch.
- Listing the branches. All local branches are displayed when the git branch is run without any options; remote branches are also displayed when the -a option is specified.
- Changing the names of branches. Renaming the current branch is possible for users who supply the -m option.
The various applications of the git branch and its application to branch management are described in the sections that follow.
Make a New Git Branch
There are various methods for making a new Git branch. Generally, it boils down to whether you are branching off the main (master) branch or something else entirely, like a new commit or tag.
Using the following syntax is a popular way to create a new branch:
git branch [new_branch_name]
The name of the branch you wish to create should be substituted for [new_branch_name].
Although the branch is created by the command, it is not immediately switched to. Use git checkout or git switch to go to the branch:
git checkout [new_branch_name]
or
git switch [new_branch_name]

From the Current Branch, Create a New Git branch.
Using the -c and -b parameters for the git switch or git checkout commands to create a Git branch from the current branch is the simplest and most common method. The syntax for both commands is as follows:
git checkout -b [new_branch_name]
or
git switch -c [new_branch_name]
The following example demonstrates how to use git switch to automatically switch to a new branch and create one:

Make a New Git Branch Using an Additional Branch
The following syntax can be used to generate a new branch from an existing one:
git checkout -b [new_branch_name] [specific_different_branch]
Replace [specific_different_branch] with the name of the current branch from which the new one is to be established, and [new_branch_name] with the name of the new branch. For instance, to split the master branch into a new branch named new_branch,
git checkout -b new_branch master

With the help of Commit Create a Branch
When code changes are saved, a Git commit serves as a snapshot of your repository. As a project is edited and refined, it may undergo several commits. A hash is a special ID assigned to each commit that can be used to build a branch based on that particular commit.
To find the hash key associated with a certain commit, run:
git log --oneline
The hash keys are in the log:

To generate a branch from a commit, use the following syntax:
git branch [new_branch_name] [commit_hash]
Example:

Branches can be created from commits, which is very useful when you need to roll back software to a previous version to remedy a bug without deleting any features.
From a Tag, Create a Branch
A tag is a point in time in a project’s history that is typically associated with a commit that is final and cannot be changed. To generate a new branch from a tag, apply the following syntax:
git branch [new_branch_name] [tag_name]
Example:

See our comprehensive Git checkout tag guide for additional information.
Utilizing Detached HEAD State, Create a Branch
A separated mental state occurs when a commit that isn’t officially a part of a branch gets checked out. You may make changes in the state and commit them, but no branch is keeping track of the changes.
Look at a certain tag or commit to start a branch using the detached HEAD state. Run git log –oneline to obtain the commit hash, then use it in the following command:
git checkout [commit_hash]
The output that the system prints is as follows:
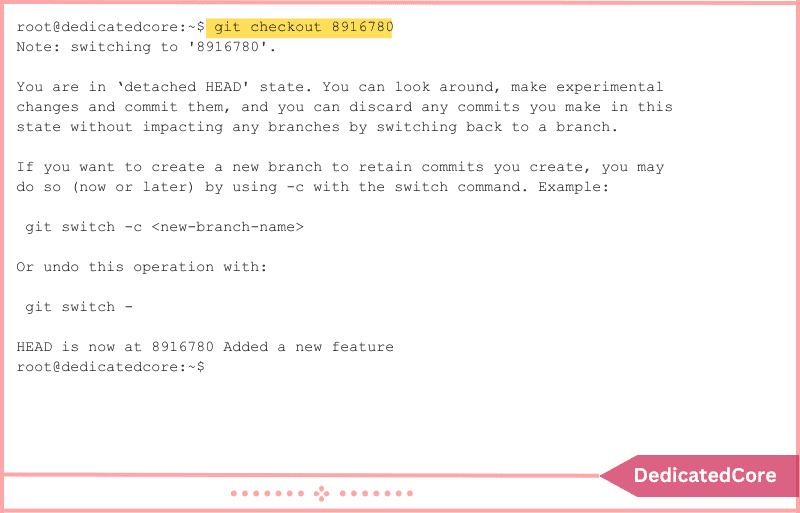
You can make changes depending on the commit, as described in the warning. But since no branch is configured to track changes, they are lost if you choose not to save them.
Use the git branch command to establish a new branch and the git switch to switch to it to save the modifications. After that, stage the modifications and make a fresh commit. You can merge the modifications into the master branch once you’ve completed your work.
From a Remote Branch, Create a Branch.
Using the git branch command and the –track option, you can establish a new branch locally based on an existing remote branch:
git branch --track [new_branch] [remote_repository]/[remote_branch]
- Enter the name you want to use for the local branch in place of [new_branch].
- The name of the remote repository containing the remote branch should be substituted for [remote_repository]. Origin is the default name if you haven’t modified it.
- The name of the remote branch from which you wish to construct a new one is [remote_branch].
The remote test-branch that is housed in the origin repository served as the basis for the creation of the new branch named new_branch in the example that follows:

As an alternative, you can preserve the original remote branch name by using the git checkout command:
git checkout --track [remote_repository]/[remote_branch]
The remote branch with its original name is automatically created locally by the git checkout command.
Establish a Branch in an Online Store
Use the git push command to construct the branch in a remote repository based on the local branch that you created in the local repository using the git branch command. This is the syntax:
git push -u [remote_repository] [local_branch]
For instance, the command that follows establishes a tracking connection and forms the branch newbranch in the remote origin repository:
git push -u origin newbranch
Delete a Git Branch: A Guide
To remove a merged local Git branch that has been pushed to the remote repository, use the -d option when running git branch. However, regardless of the merging status of a branch, you can delete it by using the -D option.
This is the syntax:
git branch -d|-D [branch_name]
The example that follows shows you how to remove a local, merged branch:

The output attests to the branch’s deletion. However, using the following syntax to remove a remote branch:
git push [remote_repository] --delete [branch_name]
Final Thought on Creating a New Branch in Git
In conclusion, any developer must master Git’s branch creation. It is key to better collaboration and productivity. You can safely establish new branches to isolate your work. This will let you try new features and contribute to projects faster. Follow the simple instructions in this article.
Use branching in Git to maximize version control in your development. You now understand how to use the git branch to create and manage branches in Git. Branches can be used to test features before integration or to address bugs.
Frequently Asked Questions (FAQ)
1. What is a Branch in Git? Why is it important?
A Git branch is a pointer to a specific commit in the project’s history. It lets developers work on new features, bug fixes, or experiments. It does this without affecting the main codebase. Branching allows changes to be generated and tested. It keeps the main project stable.
For DomainRacer users, project management is an art form of collaboration. Creating and managing Git branches is key to a harmonious hosting experience. With each branch, you paint a picture of seamless teamwork and efficient workflows. Embrace the power of Git to turn chaos into creative order.
2. Can I push the new branch to a Remote Repository?
Not possible to remove the adverb. After sprouting a new branch, you can push it to a remote repository with ease by using:
git push -u origin branch_name
This command sends up the branch, syncing it with the remote repository. It establishes a connection that enables you to track any changes with ease. With seamless updates, you’ll never miss a beat in your project.
For DomainRacer users, pushing branches to the cloud keeps everyone in sync. This allows collaborators to access the latest branch with convenience. No bumping heads or stepping on toes. Harmony reigns as teamwork flourishes, leaving conflicts in the dust.