
With Linux, a modprobe command is an effective tool that makes managing kernel modules simple for users. Knowing how to use modprobe successfully can greatly improve your Linux experience, regardless of your level of knowledge. We’ll go into the syntax, application, and real-world examples of modprobe in this tutorial. By the conclusion, you’ll be able to use modprobe to handle kernel modules with ease and confidence. The design of the Linux kernel is modular. If you choose vps hosting Canada’s rental services then you will get benefits like DDoS DDoS-protected server and immediate issue resolution.
It is possible to expand functionality via drivers or modules. To add or delete modules on Linux, use the modprobe command. The command adds any dependent modules automatically and operates intelligently. Modprobe is used by the kernel to request modules. To locate the required drivers, run the modprobe command and search the installed standard module directories. The most demanding server i.e. australian vps has to allocate a private server space to get streamlined hosting and simplified management.
Required Conditions
- A Linux-based system
- Possession of a terminal or command line
- An account that has root or sudo privileges
Explaining Modprobe Command Syntax
Sudo privileges are necessary for all modprobe commands. Using modprobe generally has the following syntax:
sudo modprobe <options> <module name>
The modprobe command adds a module by default. If there are several modules, use the -a or -all option to expand:
sudo modprobe <options> -a <first module name> <second module name>
Modprobe Command Options
Based on their intended application, the modprobe command parameters are categorized.
Alternatives for Management
Several module handling scenarios are made possible by management settings when using the modprobe command to insert or remove modules.
- –all -a: allows for the simultaneous insertion and removal of several modules.
- –remove -r: Take out a module. applies as well as removes dependencies. helpful in getting rid of damaged modules.
- -remove-dependencies: eliminate modules that depend on them.
- –resolve-alias -R: Find and print every module name that corresponds to an alias. helpful in troubleshooting alias issues.
- –first-time: prints a message if a module has already been removed or added.
- –ignore-install
–ignore-remove
-i: When adding or uninstalling a module, disregard any install or remove commands found within the module. - –use-blacklist
-b: resolved alias in the blacklist. Modules on the blacklist are not loaded automatically. - –force
-f: When version errors occur, force the insertion or removal of the module. applies both the –force-vermagic and –force-modversion options. Use prudence when using. - –force-modversion: When a module is added or removed, ignore the version. Use prudence when using.\
- –force-vermagic: When a module is added or removed, ignore version magic. Use in conjunction with
Options for Queries
Modprobe query options display configuration and dependency information.
- –show-depends
-D: lists the module along with any necessary dependency files. The prefix “install” is present in the dependencies that install alongside the module. - –showconfig
–show-config
-c: prints “exists” and the current configuration. - –show-modversions
–dump-modversions: Dumps dependence on module versions.
Modprobe Command Examples
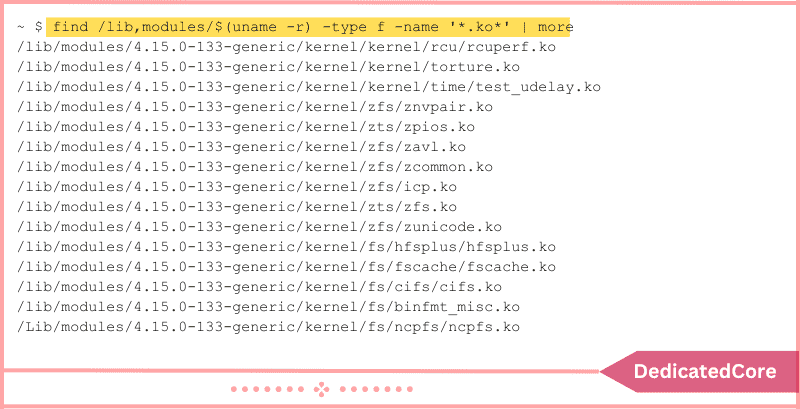
By default, all kernel modules are listed in.ko (kernel object) files under the /lib/modules directory system.
Use to locate every module that is compatible with the current kernel version:
find /lib/modules/$(uname -r) -type f -name '*.ko*' | more
Kernel Module Addition Using The modprobe Command
1. Use the modprobe command to add a module:
sudo modprobe <module name>
Example:
sudo modprobe xyz

2. Verify that the loaded module contains:
sudo modprobe <module name> --first-time
Because the module is already included in the kernel, the output displays an error.

As an alternative, use lmod to locate the module in the list of loaded active modules:
lsmod | grep <module name>
Example:
lsmod | grep xyz

Kernel Module Removal Using The modprobe Command
1. Use the modprobe -r command to remove a module:
sudo modprobe -r <module name>
Example:
sudo modprobe -r xyz
2. Run to ensure the module has been removed:
sudo modprobe -r <module name> --first-time
A message stating that the module is not included in the kernel occurs.

As an alternative, look through the list of active modules loaded:
lsmod | grep <module name>
The list of loaded modules does not include the uninstalled module.
Concluding to Using Madprobe Command in Linux
In conclusion, Linux users can explore a plethora of opportunities by becoming proficient with the modprobe command. Modprobe is an invaluable tool in your toolbox, useful for everything from debugging hardware problems to boosting system efficiency. To multitask and create numerous background active sessions in a single window you need to install a Linux screen and understand its use.
You can enable yourself to easily navigate the complex workings of the Linux kernel by becoming familiar with its syntax and many choices. Now go ahead and explore all that Modprobe has to offer to advance your level of Linux expertise.