Installing MySQL on Ubuntu 20.04 is an essential first step for anyone interested, in web application development or database management. The open-source relational database management system MySQL is well known for its dependable and strong performance. To ensure a smooth MySQL install procedure for Ubuntu 20.04. This tutorial attempts to offer a clear and straightforward set of steps. Helps in necessary steps to set up MySQL on your Ubuntu system, regardless of your level of experience.
A well-known and extensively utilized open-source relational database management system is MySQL. This SQL-based system is quick, easy to use, and scalable. It is a crucial part of the LAMP stack, which powers a large portion of the Internet. As compared with the bash shell, Zsh has more advanced features and improved customization choices and is organized to be interactive and effective.
Required Conditions:
- A device with Ubuntu 20.04
- An account that has sudo access
- Terminal access (Ctrl + Alt + T)
- Link to a network
Install MySQL on Ubuntu 20.04
Installing the MySQL Server package is necessary to host MySQL databases on Ubuntu 20.04. With the MySQL Client, you can access the database from distant clients as well.
For Ubuntu 20.04, Install MySQL Server by following these easy steps.
Step 1: Repository Update/Upgrade Package First
In this step, you have to confirm and recheck that you are installing a recent version of MySQL. With the help of the system package repository.
1. Enter the following command into the terminal window:
sudo apt update
2. After entering your password, watch for the update to be completed.
3. After that, sprint:
sudo apt upgrade
4. When asked to proceed with the upgrade, type Y and press ENTER. Await the completion of the upgrade.
Step 2: Install MySQL in Step Two.
1. After the package repository has been successfully updated, use the following command to install MySQL Server:
sudo apt install mysql-server
2. Press ENTER after selecting Y to proceed with the installation when prompted.

MySQL packages are downloaded by the system and installed on your computer.
3. Use the following to see if MySQL was installed successfully:
mysql --version

Which version of MySQL is installed on the computer is displayed in the output.
Step 3: Safeguarding MySQL
As soon as it is installed, your machine’s MySQL instance is unsafe.
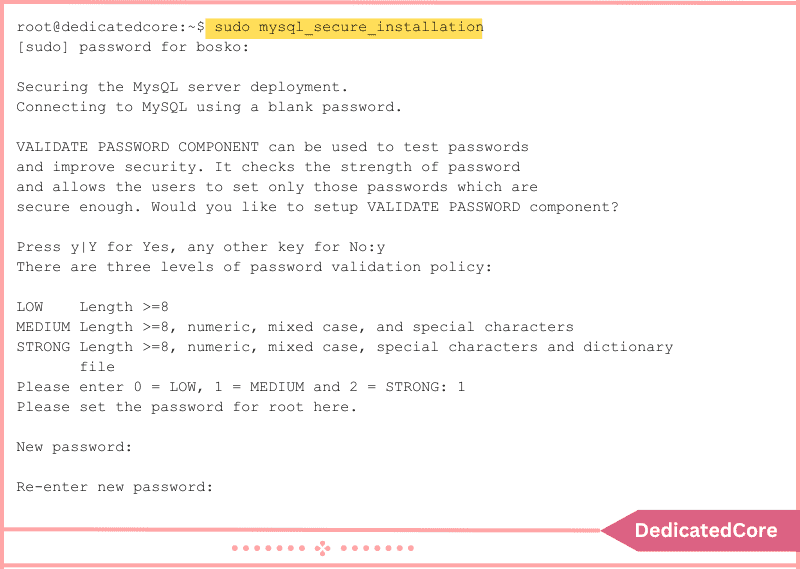
1. Use the provided security script to protect your MySQL user account using password authentication:
sudo mysql_secure_installation

2. Type in your password and select Y to proceed with configuring the VALIDATE PASSWORD component. The component determines whether the new password is sufficiently strong.
3. Select one of the three password validation levels available:
- 0 – Low. The minimum of characters in a password should be Eight Characters.
- 1 – Moderate. A minimum of eight characters in the password is divided between special, mixed-case, and numeric characters.
- 2 – Powerful. A minimum of eight characters in the password, including special, numeric, and mixed case characters; the password is then compared to a dictionary file.
Depending on the password strength you choose to set, enter 0, 1, or 2. After that, the script asks you to input your password once more for confirmation.
All passwords for MySQL users after that must be the same strength as the one you have chosen. The application calculates how strong your password is and asks for confirmation before continuing.
4. To change the password, press any key or Y if you’re happy with the one you have.

5. After that, the script requests the following security features:
- Take away anonymous users.
- Is it possible to prevent remote root login?
- Take down the test database and the link to it.
- Should I now reload the privilege tables?
Y is the suggested response to each of these queries. Enter any other key, though, if for whatever reason you would like a different option. For instance, press any key other than Y at that question if you require the remote login feature for your server.
Step 4: Verify That the MySQL Service Is Operating
MySQL is installed successfully, and the MySQL service launches automatically.
Make that the MySQL server is operational by executing:
sudo systemctl status mysql
The output ought to demonstrate that the service is up and running:

Step 5: Open a MySQL Server Session.
Finally, execute the following command to log in to the MySQL interface:
sudo mysql -u root

You can now build databases, run queries, and check out your newly configured MySQL system. See our MySQL Commands Cheat Sheet for a list of some essential MySQL commands.
Final Thoughts on Install MySQL on Ubuntu 20.04
In conclusion, everybody works with databases or web development. They need to know how to install MySQL on Ubuntu 20.04. Stages here provide an easy-to-follow and true way to install MySQL on your Ubuntu machine. Now that you are starting to work with MySQL, you have the basic understanding needed to effectively manage databases.
Use this robust relational database management system to provide safe, well-organized data storage for your projects and applications. Your computer should now be running a MySQL server that is up and running. Test out the many features that MySQL offers and begin discovering its potential. Hope you got a clear idea about installing MySQL Ubuntu.
Frequently Asked Questions (FAQ)
1. What version of Ubuntu support MySQL installation using apt?
Most versions of ubuntu including 18.04, 20,04, 22.04 LTS. It supports MySQL installation through the apt package manager.
2. How do I check if MySQL is running?
sudo systemctl status mysql
You will see a “active” status if MySQL is running.

