One essential ability for developers handling version control is restoring a Git stash. You can switch branches or take care of pressing problems without committing unfinished work when you stash changes. But it’s just as crucial to know how to restore a stockpile properly. We’ll go over how to restore a Git stash step-by-step in this tutorial, making sure that your stored modifications are seamlessly merged back into your codebase. The changes made on working directory, to save that and come back to work on the same all this is possible with Stash an Untracked File in Git.
Unfinished work placed in a local repository is called a Git stash. When they need to work on something else and don’t want to commit the changes just yet, developers stow the modifications. Work that has been parked doesn’t show up in other repositories or be visible to other developers.
When you’re ready to work on the incomplete code, create a new branch from the Git stash or restore the previous changes.
Requirements
- Install Git (on Windows, Ubuntu, macOS, CentOS 7, or CentOS 8).
- A repository for Git.
How to Get a Git Stash Back
Git names the most recent stash, stash@{0}, and keeps it under refs/stash. Every previous stash is kept in the reference’s reflog and given an index number (stash@{1}, stash@{2}, etc.). Either the index number or, if supplied when stashing, the stash name is needed to restore a stash.
A Git stash can be restored in one of two ways:
- Make use of git stash pop.
- Applying git stash.
Both methods of recovering a Git stash are described in the sections that follow.
1. Return Changes to the Git Stash Applying Git Stash
While the stash is restored, it remains in the reference after using the git stash apply command. This retains the stash in the reference until it is removed by hand. Here’s the syntax:
git stash apply stash@{n}
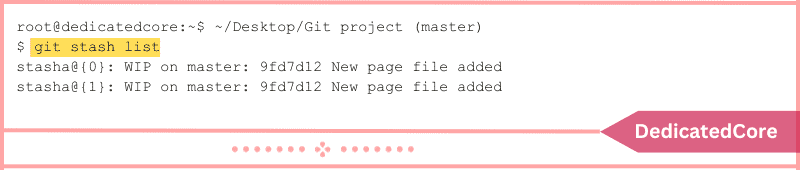
Give the stash index number for {n}. Run to determine the stash index number:
git stash list
For example, use the following command to restore stash@{0}:
git stash apply stash@{0}
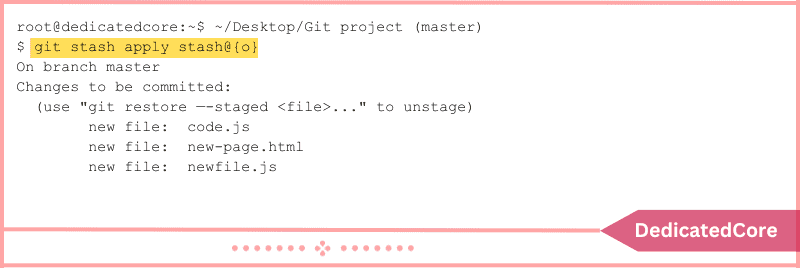
The command preserves the stash in the reference while applying the stored modifications to the repository.
2. Use Git Stash Pop to Restore Git Stash Changes
The git stash pop command plans the stash’s removal from the reference and recovers the modifications that were stashed. Git outputs the stash SHA value and indicates that the stash has been dropped after it has been popped.
The following is the syntax to pop a Git stash:
git stash pop stash@{n}
To pop stash@{1}, for instance, run:
git stash pop stash@{1}
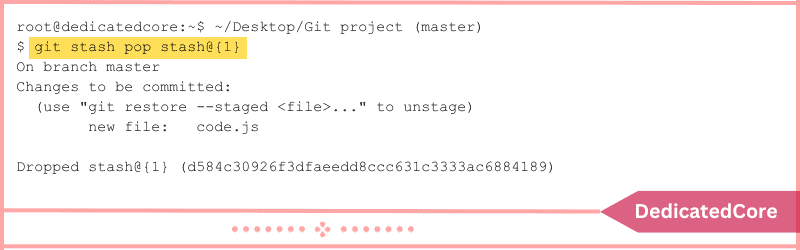
The command schedules the stash’s deletion and implements the modifications.
Final Thought on How to Restore a Git Stash
Gaining proficiency in the restoration of Git stashes enables developers to effectively handle their work-in-progress. Understanding the nuances of the stash command and how it is restored can help you handle unforeseen problems. Swap between branches with confidence, and keep your version control history neat and orderly. Having this talent in your toolbox will help you handle a variety of development challenges with more efficiency and agility.
Two ways to restore a Git stash were covered in this tutorial: either apply the stash and save it for later use, or pop and remove it from the reference. Git stashes allow you to put away incomplete work and come back to it at a later time without cluttering the repository. We also recommend that you read our guide on Git’s hidden files.